Servlet Basics
Servlets are Java programs running on a web server that produce results viewed remotely on a web server. Servlets has the same purpose that CGI or PHP had in the past. We shall describe how Servlets works with some examples. You will also learn about Servlet Request and Response Model, Servlet Life Cycle, Servlet Scope Objects and Error Handling.
Servlet Request and Response Model
Note that although there are two types of servlets (GenericServlet and HttpServlet), we will discuss here only HttpServlet since GenericServlet can be used for advanced needs. The important thing here is that you should use GenericServlet if you want your servlet to response in another protocol rather than HTTP.
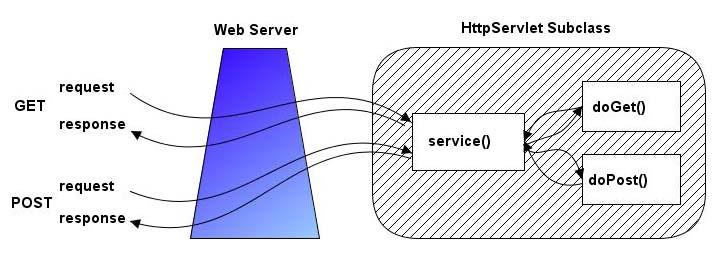
Figure-1 Request and Response Model of HttpServlets
HttpServlets are servlets that respond to the HTTP protocol requests which is used by web servers to return us the requested web pages. We need to extend javax.servlet.http.HttpServlet class to write a servlet. We should select one of doGet or doPost methods for overriding. This choice depends on what type of http request (GET request or POST request) we are expecting. GET request is generally only used to retrieve data from the web server, however POST request are used for more complex requests like storing data. We will generally override both methods in our tutorials and call a processRequest method to handle both types of request.
Let’s start with our first servlet which is called HelloWorld1 servlet. HelloWorld1 servlet will just print “Hello World1” message.
The source code shown in this section can be found in HelloWorld1 project. |
Figure-2 shows overridden doGet and doPost methods in our HelloWorld1 servlet. Both methods call processRequest method to handle the http requests. Figure-3 shows processRequest method.
..........processRequest(request, response);..........processRequest(request, response); |
public class HelloWorld1 extends HttpServlet { . /** Processes requests for both HTTP < code >GET< /code > and < code >POST< /code > methods. * @param request servlet request * @param request servlet response */ . protected void processRequest (HttpServletRequest request, HttpServletResponse response) .....throws ServletException, IOException { .....response.setContentType(“text/html;charset=UTF-8”); ..........PrintWriter out = response.getWriter(); ..........Out.println(“< html >”); ..........Out.println(“< head >”); ..........Out.println(“< title >Servlet HelloWorld1< /title >”); ..........Out.println(“< /head >”); ..........Out.println(“< body >”); ..........Out.println(“< h1 >HelloWorld1< /h1 >”); ..........Out.println(“< /body >”); ..........Out.println(“< /html >”); ..........Out.close(); } |
Figure-3 ProcessRequest method used in HelloWorld1 servlet
We get the PrintWriter object from HttpServletResponse object to write the contents of the html page to other side. After writing our content, we close the PrintWriter object. You will get a result similar to shown in Figure-4 after you run the project.
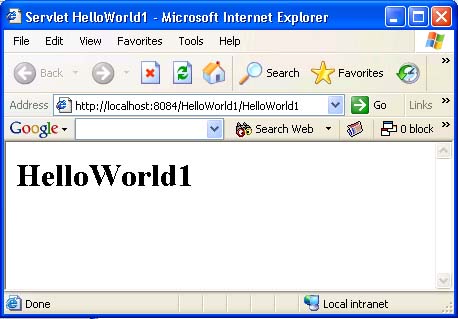
Figure-4 HelloWorld1 servlet running in a browser
Servlet Life Cycle
Servlet container creates only one instance of each servlet but the request of each user is handled with a separate thread. Each thread then calls doGet or doPost methods. This idea is shown in Figure-5.

Figure-5 A way of handling Servlet requests
The init method of the servlet is called when the servlet is first created and each time the server receives a request for a servlet, the server spawns a new thread calls service method.
The service method checks the HTTP request type (GET, SET, PUT, DELETE, etc.) and calls doGet, doPost, doPut, doDelete, etc. method as appropriate.
Finally, the server may decide to remove a previous loaded servlets. In this case, the server calls destroy method of the servlet.
Servlet Scope Objects
There are four scope objects in servlets which enables sharing information between web components. The scope objects and their corresponding Java classes are listed below:
• Web Context – javax.servlet.ServletContext
• Session – javax.servlet.http.HttpSession
• Request – javax.servlet.HttpServletRequest
• Page – javax.servlet.jsp.PageContext
You can get attribute values from servlet scope objects using getAttribute method and set new values of attributes using setAttribute method. For example, you can get the client’s IP address by calling getRemoteAddr method of HttpServletRequest class.
Let’s develop an example on how to use servlet scope objects. In this example, we will print the information about the server which hosts our servlet.
The source code shown in this section can be found in ServerInfoServlet project. |
In our example, we will use the following methods to get the information about the server which hosts the client:
public String getServerName()
public String getServerPort()
public String getServletContext().getServerInfo()
public String getServerPort()
public String getServletContext().getServerInfo()
Figure-6 shows processRequestMethod of ServerInfoServlet servlet and Figure-7 shows the output of the servlet in a browser.
| .......... public class ServerInfoServlet extends HttpServlet { ........../** Processes requests for both HTTP < code >GET< /code > and < code >POST< /code > methods. * @param request servlet request * @param request servlet response */ .......... protected void processRequest (HttpServletRequest request, HttpServletResponse response) throws ServletException, IOException { ..........response.setContentType(“text/html;charset=UTF-8”); ..........PrintWriter out = response.getWriter(); .......... ..........Out.println(“< html >”); ..........Out.println(“< head >”); ..........Out.println(“< title >Servlet ServerInfoServlet< /title >”); ..........Out.println(“< /head >”); .......... ..........Out.println(“< body >”); ..........Out.println(“< p >Server Name:+request.getServerName()+”< br >”); ..........Out.println(“ ..........Out.println(“Server Path:+request.getServerPath()+”< /p >”); .......... ..........Out.println(“< /body >”); ..........Out.println(“< /html >”); .......... ..........Out.close(); } .......... |
Figure-6 ProcessRequest method used in ServerInfoServlet servlet
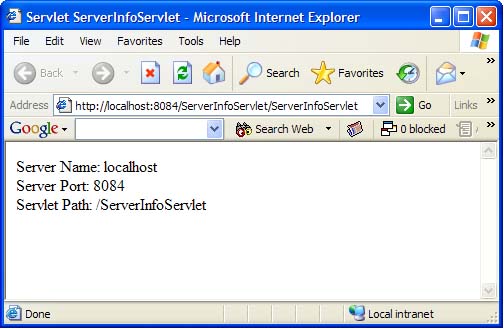
Figure-7 ServerInfoServlet servlet running in a browser
Error Handling
There are two ways to handle errors in servlets. You can send an error message or throw a ServletException.
For example, if a servlet can not find the requested file, it can display a 404 (“File Not Found”) message to the user by using the following command instead of directly writing the output to the PrintWriter object:
response.sendError(HttpServletResponse.SC_NOT_FOUND)
There are several other HTTP error codes which can be sent to the client. Some of the important ones are listed in Table-1. You can search on the internet about the details of those messages if they are not clear for you.
Mnemonic | Code | Message |
SC_OK | 200 | OK |
SC_NO_CONTENT | 204 | No Content |
SC_MOVED_PERMANENTLY | 301 | Moved Permanently |
Servlets Advanced
After describing some basic programming of servlets, we will describe some advanced topics of servlets in this tutorial, viz., Session Tracking, Servlet Filters, Servlet Life Cycle Events, Including, forwarding and redirecting, Servlet Chaining and Applet Servlet Communication.
Session Tracking
HTTP is a stateless protocol which means that each request done using HTTP is independent from each other. This is a restriction in HTTP since some applications like e-commerce sites require to hold state information. One of the traditional examples of state is a shopping cart. In this tutorial, we will learn how to hold states between HTTP requests using servlets.
We will specifically use cookies to hold states between servlet requests. Cookie is a file on a web user’s hard disk that is used by web sites to hold information about the web users. So, the idea with cookies is to put state information into cookies and retrieve the information from the cookie in the successive requests.
Working with cookies using servlets is very easy since there is a specific javax.servlet.http.Cookie class in Servlet API. New cookie instances can be created with this class. They can also be added and retrieved easily using methods in HttpServletRequest and HttpServletResponse objects.
SimpleCookieServlet is a servlet which detects whether a web user previously visits itself by using cookies. It simply searches for cookies in the user’s disk. If it can not find the cookie which is added previously, it simply adds a new cookie and prints “This is your first visit.” message. The cookie added contains the last time the user visits the site, so if the servlet finds this cookie it prints “Your last visit to the site was on XXX” message. Here XXX is the time of latest visit of the user. Figure-1 shows the processRequest method of the servlet. We first look for a previously written cookie and print appropriate message. At the last step we are adding a new cookie containing current time.
The source code shown in this section can be found in SimpleCookieServlet project. |
Figure-2 shows our first visit to the servlet. Since, there is no cookie yet, the servlet detects that this is our first visits and print appropriate message. Figure-3 shows the behavior of the servlet when we visit it second time. In this case, the servlet detects the cookie added in the previous step and prints the time of the visit.

Figure-1 ProcessRequest method of SimpleCookieServlet servlet
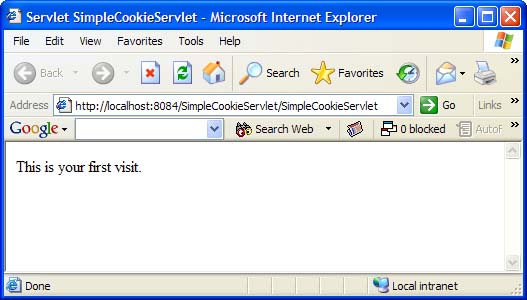
Figure-2 First visit to the SimpleCookieServlet servlet
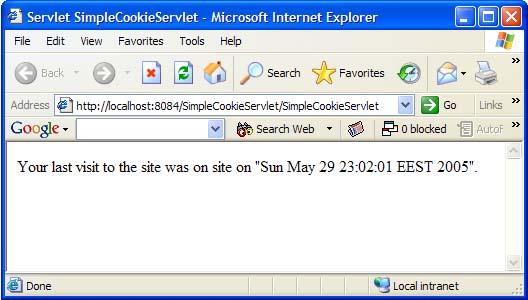
Figure-3 Second visit to the SimpleCookieServlet servlet
Servlet Filters
Filters are introduced in Servlet specification version 2.3. Filters are used to process the content in request or response objects of servlets and generally do not produce responses themselves.
Let’s create an example for a filter which prints the duration of all requests in our web server into the log file of Tomcat. This is a classical example which also came with Tomcat as an example of filter, but this allows you to understand how servlet filters work.
The source code shown in this section can be found in TimerFilterServlet project. |
We need to implement javax.servlet.Filter interface to create a new filter. Filter interface has a doFilter method and the actual work of the filter is done in this method. Figure-4 shows doFilter method implementation of TimerFilter.

Figure-4 doFilter method implementation of TimerFilter
Actual processing of the filtered servlet is done in the line where we call chain.doFilter(request, response) method. This method calls servlet chain to process the request. So, if we want to pre-process the servlet request we do our work before this method and if we want to post-process the servlet response, we do filter code after this method.
Since we need to calculate the time passed for generating actual servlet response, we add our filter code on both sides. We get the current time using System.currentTimeMillis method before and after calling the filter chain and log the difference between those times.
Servlet Life Cycle Events
As you remember from the previous tutorial, the life cycle of event is controlled by the web container in which the servlet has been deployed. When a request is mapped to a servlet, the container performs the following steps:
1. If an instance of the servlet does not exist, the web container loads the servletclass, creates an instance of the servlet class and initializes the servlet instanceby calling the init method.
2. Invokes the service method, passing request and response objects.
3. If the container needs to remove the servlet, it finalizes the servlet by calling the servlet's destroy method.
2. Invokes the service method, passing request and response objects.
3. If the container needs to remove the servlet, it finalizes the servlet by calling the servlet's destroy method.
The texts with red color are examples of events in servlet life cycle. If you want to react to those events in servlet lifecycle you should create listener objects. The table below shows several types of events and their corresponding listener interfaces needed to implement to catch those events:
Related Object | Events | Listener Interface and event |
Web context | Initialization and destruction | javax.servlet.ServletContextListenerjavax.servlet.ServletContextEvent |
Web context | Attribute added, removed, or replaced | javax.servlet.ServletContextAttributeListenerjavax.servlet.ServletContextAttributeEvent |
Session | Creation, invalidation, activation, passivation, and timeout | javax.servlet.http.HttpSessionListenerjavax.servlet.http.HttpSessionActivationListenerjavax.servlet.http.HttpSessionEvent |
Session | Attribute added, removed, or replaced | javax.servlet.http.HttpSessionAttributeListenerjavax.servlet.http.HttpSessionBindingEvent |
Request | A servlet request has started being processed by web components | javax.servlet.ServletRequestListenerjavax.servlet.ServletRequestEvent |
Request | Attribute added, removed, or replaced | javax.servlet.ServletRequestAttributeListenerjavax.servlet.ServletRequestAttributeEvent |
Including, forwarding and redirecting
Including a web resource into your servlet can be very useful. For example, you can have a company logo which should be placed on all web pages. In this case, instead of generating html code for the banner for each servlet, you can create a BannerServlet which produces the html code for the banner and include it into other servlets in your web site.
Including a web resource can be done by obtaining RequestDispatcher object from ServletContext object and then calling include() method of the RequestDispatcherObject. Example code for these operations is written below:
RequestDispatcher dispatcher = getServletContext().getRequestDispatcher("/images/banner.gif");
dispatcher.include(request, response);
dispatcher.include(request, response);
As you will notice, the web resource can be any type including a servlet or image.
Forwarding is another useful mechanism. For example, if you want to have a component doing some preliminary works and doing the real job in another component, then the preliminary component can forward the request to the real component when it finished its job.
Forwarding requires obtaining a RequestDispatcher object from ServletContext object for the web resource. Instead of calling include method, we call forward() method in this case. Example code for these operations is written below:
RequestDispatcher dispatcher = getServletContext().getRequestDispatcher("/ForwardedServlet ");
dispatcher.forward(request, response);
dispatcher.forward(request, response);
There are two more methods for redirecting browser to another web resource. The first one is using the header and status elements of HTTP response as shown below:
response.setStatus(response.SC_MOVED_PERMANTLY);
response.setHeader("Location", http://www.exforsys.com);
response.setHeader("Location", http://www.exforsys.com);
The code above redirects the web browser to Google’s web site. The second method is calling sendRedirect(String url) method of ServletResponse object as shown below:
Servlet Chaining
The mechanism described above can be used as a communication medium between servlets. But, there is one more requirement to handle this communication. We should find a way to pass data between the servlets!
We will use attributes sent by the HttpServletRequest object. The code below shows how to set attributes on the request so that the next servlet can get this information:
RequestDispatcher rd = req.getRequestDispatcher("Servlet3");
req.setAttribute("key1", value1); // This line adds a new attribute
req.setAttribute("key2", value2); // This line adds another attribute
req.setAttribute("key1", value1); // This line adds a new attribute
req.setAttribute("key2", value2); // This line adds another attribute
rd.forward(req, resp); // This will redirect request to Servlet3
Next servlet reads the attributes similarly with the following calls:
Object val1 = req.getAttribute("key1");
We will develop a TimedHelloWorldServlet web application in this section to practice on servlet chaining. TimedHelloWorldServlet project has two servlets: TimeServlet and HelloWorldServlet. When TimeServlet is called by the web browser, it puts the current time into request attributes and calls HelloWorldServlet. HelloWorldServlet gets current time from the request attributes and prints a “Hello World” message together with the current time.
The source code shown in this section can be found in TimedHelloWorldServlet project. |
Figure-5 shows ProcessRequest method of the TimeServlet servlet. It gets the details of the current time from a Calendar object and puts them into the request as an attribute. After preparing the attributes of the request, it forwards the request to HelloWorldServlet servlet.
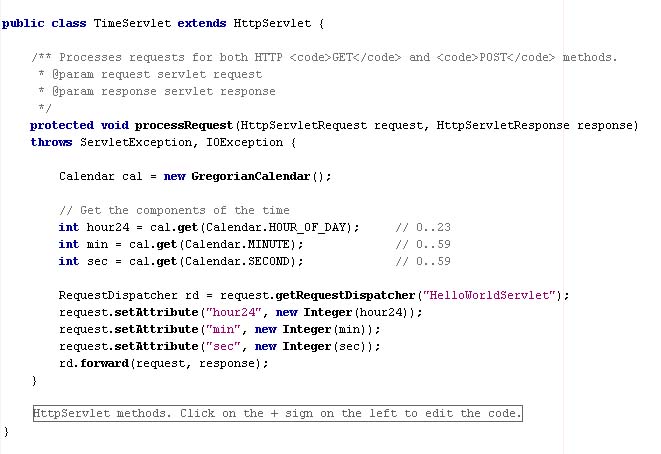
Figure-5 processRequest method of TimeServlet
Figure-6 shows ProcessRequest method of the HelloWorldServlet servlet. It gets the details of the current time from the attributes of the request object and prints the current time.
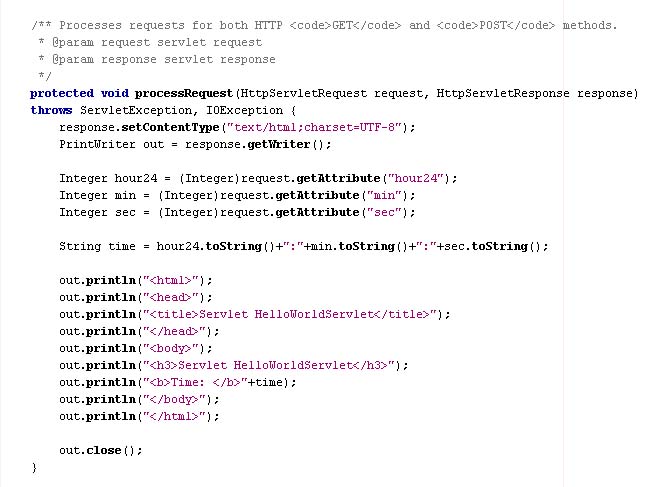
Figure-6 processRequest method of HelloWorldServlet
Final output of TimeServlet is shown in Figure-7. Note that although the url in the address bar of the browser still points to the TimeServlet, the content is produced by HelloWorldServlet.
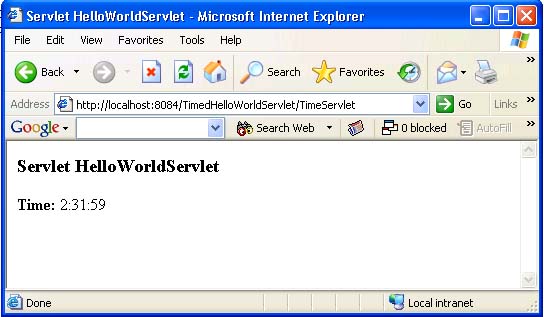
Figure-7 Output of TimeServlet
Applet Servlet Communication
Although several methods are available to connect servlets with applets, we will select one method in this section and give an example for this type of implementation.
We will print the current time in our applet by obtaining time information from the servlet. So our servlet (namely TimeProviderServlet) will work like a server on our machine and the applet (namely TimeApplet) will connect and get current time from the servlet using object-based HTTP communication. Servlet will send current time by serializing a String object of current time.
The source code shown in this section can be found in AppletServletCommunication project. Note that this project can not be run directly since deployment of Java applets in NetBeans is not done automatically. |
Figure-8 shows the source code of TimeProviderServlet servlet.
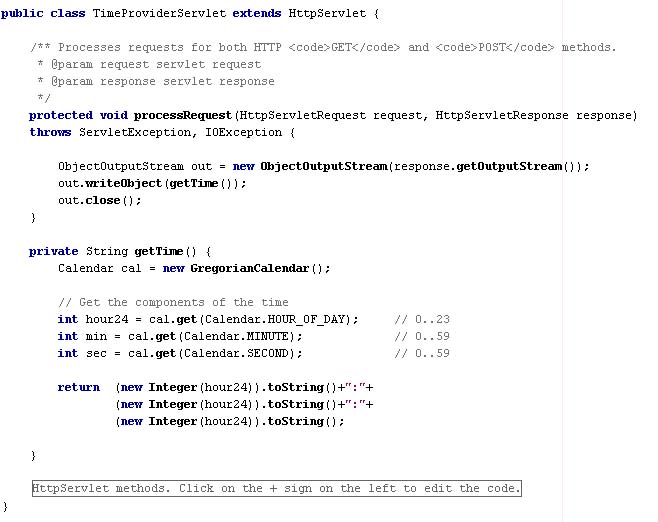
Figure-9 shows the getTime() method of TimeApplet applet.
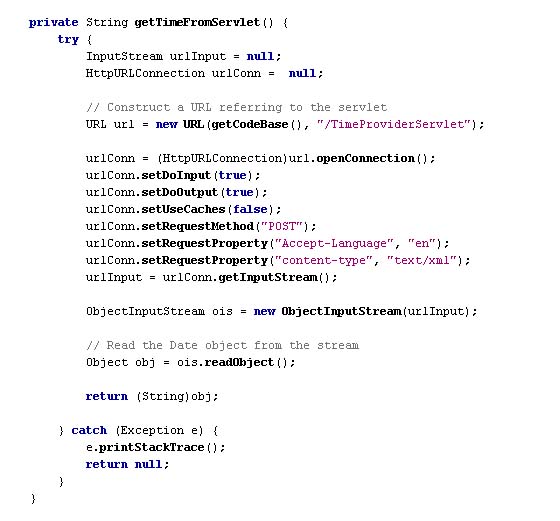
Figure-9 TimeApplet source code
Note that double clicking on html file of the applet will not work since the applet and the servlet should reside on the same we server.
No comments:
Post a Comment