MySQL 5.5
How to Install and Get Started
This tutorial can be completed in a 3-hour session with or without guidance from instructor.
Introduction
Introduction to Relational Database and Structure Query Language (SQL)
A relational database organizes data in tables. A table has rows (records) and columns (fields). Tables are related to eliminate data redundancy and to ensure data integrity.
A high-level language called Structure Query Language (SQL) can be used for structuring, querying and modifying the data in a relational database. SQL defines a set of commands, such as
SELECT, INSERT, UPDATE, DELETE, CREATE TABLE, DROP TABLE, among others.For example, suppose we have set up a table called
class101 (in a database called studentdb) with 3 columns: id, name and gpa. Each column has a data type, such as INT for column id,FLOAT for gpa, and VARCHAR(50) (variable-length strings of up to 50 characters) for name.Database: studentdb Table: class101 +-----------+----------------+-------------+ | id (INT) | name (VARCHAR) | gpa (FLOAT) | +-----------+----------------+-------------+ | 11 | Tan Ah Teck | 4.4 | | 33 | Kumar | 4.8 | | 44 | Kevin | 4.6 | +-----------+----------------+-------------+
We could issue these SQL commands, which are intuitive, to query the database or manipulate data:
-- SELECT --
SELECT name, gpa FROM class101
SELECT name, gpa FROM class101 WHERE name = 'Tan Ah Teck'
SELECT * FROM class101 WHERE gpa > 3.0 OR name LIKE '%T_n%' ORDER BY gpa DESC, name ASC

-- SQL strings use single quotes (instead of Java/C/C++'s double quotes).
-- The wildcard * denotes all the columns.
-- Comparison operators are: =, >, <, >=, <=, <> (!=).
-- Use operator "LIKE" for pattern matching.
--    The wildcard % matches zero or more (any) characters;
--    The wildcard _ matches one (any) character.

-- DELETE --
DELETE FROM class101  // Delete ALL rows!!!
DELETE FROM class101 WHERE id = 33

-- INSERT --
INSERT INTO class101 VALUES (88, 'Mohammed Ali', 4.88)

-- UPDATE --
UPDATE class101 SET gpa = 5.0  // ALL rows
UPDATE class101 SET gpa = gpa + 1.0 WHERE name = 'Tan Ah Teck'

-- CREATE TABLE / DROP TABLE --
CREATE TABLE class101 (id INT, name VARCHAR(50), gpa FLOAT)
DROP TABLE class101  // Delete the table. No UNDO!!!
Introduction to MySQL
MySQL is an open-source, relational database management system (RDBMS) created by Michael "Monty" Widenius and David Axmark in 1995. It was owned by a Swedish company called MySQL AB, which was bought over by Sun Microsystems in 2008. Sun Microsystems was acquired by Oracle in 2010. MySQL is successful, not only because it is free (there are many free and open-source databases), but also for its reliability, speed, performance and features.
The mother site for MySQL is www.mysql.com. The ultimate reference for MySQL is the "MySQL Reference Manual", available at http://dev.mysql.com/doc/#manual. The PDF file has over 3700 pages!!!
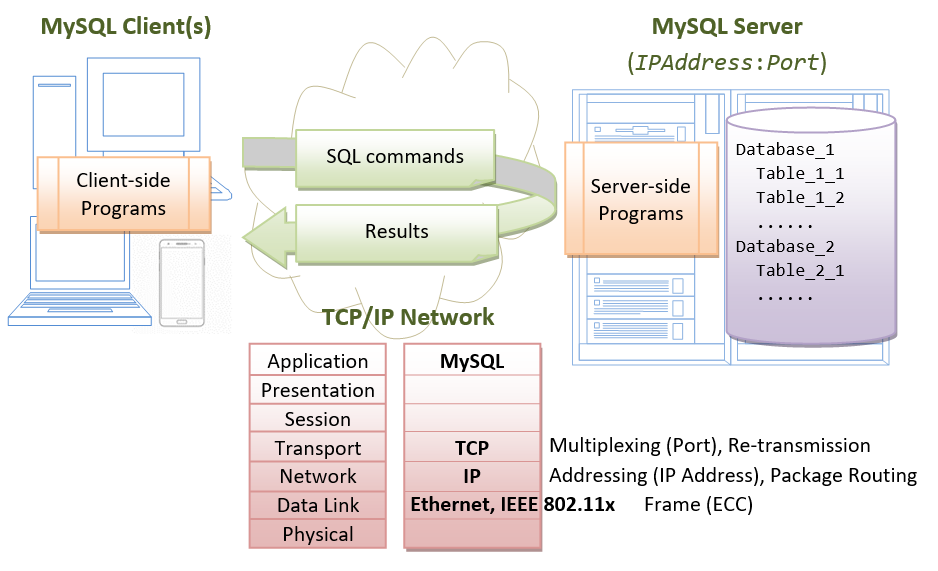
MySQL is a client-server system runs over TCP/IP network. In other words, the server runs on a machine with a IP address (or hostname), on a chosen TCP port number. The default TCP port number for MySQL is 3306, but you are free to choose another port number between 1024 and 65535 to run the server. Users can access the server via a client program.
A MySQL database server contains one or more databases (aka schemas). A database contains one or more tables.
How to Install MySQL 5.5 and Get Started
STEP 1: Download and Install MySQL
- Download MySQL from www.mysql.com.
- From the top-level tabs, select the "Downloads (GA)" ⇒ "MySQL Community Server" ⇒ "General Available (GA) Release", "MySQL Community Server 5.5.xx", where xx is the latest upgrade number.
- Select "Microsoft Windows"; or your target platform.
- Choose the ZIP Archive (without MSI Installer) "
mysql-5.5.xx-win32.zip(133M)". (DO NOT use "mysql-5.5.xx.zip" (27M), which is the source distribution and requires compilation.) - Click "No thanks, just take me to the downloads!".
- Select the nearest "HTTP" mirror site.
- UNZIP into a directory of your choice. DO NOT unzip into your desktop (because it is hard to locate the path). I suggest that you unzip into "
d:\myproject". MySQL will be unzipped as "d:\myproject\mysql-5.5.xx-win32". For ease of use, we shall shorten and rename the directory to "d:\myproject\mysql".
I recommend the ZIP version (instead of using installer). You can simply delete the entire MySQL directory when it is no longer needed (without running the un-installer). You are free to move or rename the directory. You can also install (unzip) multiple copies of MySQL in the same machine.
I shall assume that MySQL is installed in directory "
d:\myproject\mysql". But you need to TAKE NOTE OF YOUR MySQL INSTALLED DIRECTORY. Hereafter, I shall denote the MySQL installed directory as <MYSQL_HOME>.(For Mac Users): You could download the DMG archive and run (double-click) the installer. The files will be installed into "
/usr/local/mysql-5.x.xx-osx10.x-x86_64". Readhttp://dev.mysql.com/doc/refman/5.5/en/macosx-installation-pkg.html. [You can also use the TAR-ball, which is similar to zip, if you know how to un-tar the archive.]STEP 2: Create the Configuration File
Programmers need to view the file extension (such as
.txt, .ini). To display the file extension, run "Control Panel" ⇒ "Folder Options" ⇒ Select tab "View" ⇒ Uncheck "Hide extensions for known file types".Use a text editor to create the following configuration file called "
my.ini" and save it in your MySQL INSTALLED DIRECTORY (e.g., "d:\myproject\mysql"). You can ignore lines beginning with #, which are comments. IMPORTANT: You need to modify the highlighted lines for your MySQL installed directory!!!# Save as my.ini in your MySQL installed directory [mysqld] # Set MySQL base (installed) directory # @@ Change to your MySQL installed directory @@ basedir=d:/myproject/mysql # Set MySQL data directory # @@ Change to sub-directory "data" of your MySQL installed directory @@ datadir=d:/myproject/mysql/data # Run the server on this TCP port number port=8888 [client] # MySQL client connects to the server running on this TCP port number port=8888
Explanation:
- MySQL operates as a client-server system. There are two sections in this configuration:
[mysqld]for the server, and[client]for the client. - "
basedir" and "datadir" specify the MySQL installed and data directories, respectively. Make sure that you set their values according to your own installation. You need to use Unix-styleForward-Slash'/'as the directory separator, as shown (instead of Windows-style backward-slash'\'). - MySQL is a TCP/IP application. The default TCP port number for MySQL is 3306. However, it may crash with a MySQL server already running in some lab machines. You may choose any port number between 1024 to 65535, which is not used by an existing application. I choose 8888 for our server.
- This configuration file specifies the bare minimum. There are many many more configuration options. Sample configuration files are provided in
<MYSQL_HOME>.
(For Notepad Users Only) If you use Notepad, make sure that you double-quote the filename
"my.ini" when saving the file; otherwise, it may be saved as "my.ini.txt". Worse still, you will not see the file extension ".txt", unless you enable displaying of file extension. Nonetheless, "my.ini.txt" has file type of "Text Document"; while "my.ini" has the file type of "Configuration Settings". [Don't use Notepad for programming!!! At the minimum, you should have Notepad++.](For Mac Users Only) If you use the DMG installer, skip this step. MySQL server will be running on the default port number of 3306.
(For Advanced Users Only) Where to place
In Windows, the options are combined from the following files in this order:
my.ini configuration file?In Windows, the options are combined from the following files in this order:
C:\Windows\my.ini, C:\Windows\my.cnf, C:\my.ini, C:\my.cnf, <MYSQL_HOME>\my.ini,<MYSQL_HOME>\my.cnf. If an option is specified in multiple places, the last setting takes effect. Our "my.ini" is kept in <MYSQL_HOME>, which is the last location and overrides all the previous settings. Alternatively, you can keep the my.ini in any location, and use the startup option --defaults-file=filename to specify the location of the configuration file and bypass all the files listed above.STEP 3: Start the Server
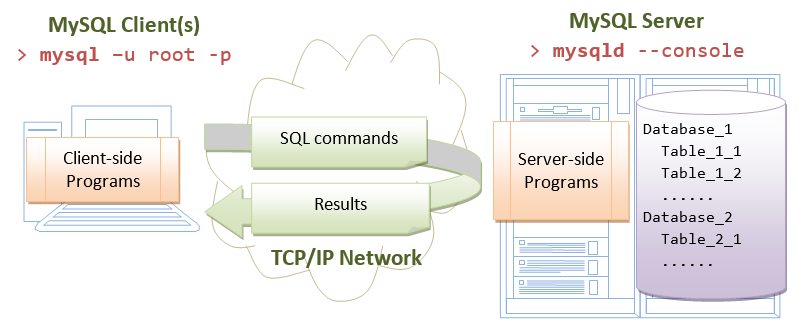
MySQL is a client-server system. The database is run as a server application. Users access the database server via a client program, locally or remotely, as illustrated:
- The database server program is called "
mysqld.exe" (with a suffix'd'which stands for daemon - a daemon is a program/process running in the background). - The interactive client program is called "
mysql.exe" (without the'd').
MySQL executable programs are kept in the "
bin" sub-directory of your MySQL installed directory.Startup Server
To start the database server, launch a CMD shell. Set the current directory to "
<MYSQL_HOME>\bin", and run command "mysqld --console".-- Change the current directory to MySQL's "bin" prompt> d: -- Change the current drive D:\...> cd \ -- Change Directory (cd) to the ROOT directory D:\> cd myproject\mysql\bin -- Change Directory (cd) to YOUR MySQL's bin directory -- Start the MySQL Database Server D:\myproject\mysql\bin> mysqld --console
(For Mac Users Only) MySQL is under "
/usr/local/mysql-...". Start a "Terminal" (which is a Bash shell), run"cd /usr/local/mysql-.../bin"to change directory to the MySQL binary directory.- "
./mysqld --console" to start the server. You need to insert "./" in front of the executable file (as the current directory'.'is not included in the search path by default).
You shall see these messages in the console. Take note of the TCP port number.
......
......
XXXXXX XX:XX:XX [Note] mysqld: ready for connections.
Version: '5.5.xx-community'  socket: ''  port: 8888  MySQL Community Server (GPL)
MySQL database server is now started, ready to handle client's requests.
Explanation:
- The
--consoleoption directs the server output messages to the console. Without this option, you will see a blank screen. - Observe that the database server runs on TCP port 8888, as configured in the "
my.ini".
(Skip Unless ...) "Anything that can possibly go wrong, does." Read "Common Problems in Starting the MySQL Server after Installation".
Shutdown Server
The quickest way to shut down the database server is to press control-c (or control-break) to initiate a normal shutdown. DO NOT KILL the server via the "close" button.
Observe these messages from the MySQL server console:
XXXXXX XX:XX:XX [Note] mysqld: Normal shutdown
......
XXXXXX XX:XX:XX  InnoDB: Starting shutdown...
XXXXXX XX:XX:XX  InnoDB: Shutdown completed; log sequence number 0 44233
......
XXXXXX XX:XX:XX [Note] mysqld: Shutdown complete
(For Advanced Users Only) Alternatively, you could shutdown the server via the utility program "
mysqladmin". Start another CMD shell. Run the "mysqladmin" (with user root) as follows:-- Without password d:\myproject\mysql\bin> mysqladmin -u root shutdown -- With password d:\myproject\mysql\bin> mysqladmin -u root -ppassword shutdown
STEP 4: Start a Client
Recall that MySQL is a client-server system. Once the server is started, one or more clients can be connected to the database server. A client could be run on the same machine (local client); or from another machine (remote client).
To login to a MySQL server, you need to provide a username and password. During the installation, MySQL provides a privileged user (aka superuser) called "
root" WITHOUT setting the password.Let's start a local client (on the same machine) with this superuser "
root". First, make sure that the server is running (see previous step to re-start the server if it has been shutdown).Start a Client
Recall that the server program is called "
mysqld" (with a suffix 'd' for daemon), while the client program is called "mysql" (without the 'd'). Start another CMD shell to run the client:-- Change the current directory to <MYSQL_HOME>\bin prompt> d: -- Change the current drive D:\...> cd \ -- Change Directory (cd) to the ROOT directory D:\> cd myproject\mysql\bin -- Change Directory to YOUR MySQL's "bin" directory -- Starting a client with superuser "root" D:\myproject\mysql\bin> mysql -u root Welcome to the MySQL monitor. Commands end with ; or \g. Your MySQL connection id is 1 Server version: 5.1.39-community MySQL Community Server (GPL) Type 'help;' or '\h' for help. Type '\c' to clear the current input statement. -- Client started. The prompt changes to "mysql>". -- You can now issue SQL commands. mysql>
(For Mac Users Only) Start another "Terminal", run
"cd /usr/local/mysql-.../bin"to change directory to the MySQL binary directory.- "
./mysql -u root" to start a client. You need to insert "./" in front of the executable file (as the current directory'.'is not included in the search path by default).
(Skip Unless...) Read "Common Problems in Starting the mysql client".
Before we proceed, let's issue a "
status" command to display the server information. Check the Server's Port Number. Make sure that you are connecting to YOUR MySQL server (running on port 8888), because there could be many MySQL servers running in your machine (on different port numbers).mysql> status -------------- mysql Ver 14.14 Distrib 5.1.51, for Win32 (ia32) ...... Current user: root@localhost TCP port: 8888 ......
STEP 5: Set the Password for Superuser "root" and Remove the Anonymous User
As mentioned earlier, MySQL installation provides a privileged user called "
root" WITHOUT setting a password. "root" is a superuser that can do anything, including deleting all the databases. Needless to say, you have to set a password for root. The root's password shall only be made available to the database administrator, not the common users.Set Password for Superuser root
Let us continue with our client session.
-- Query all the users and their password from database "mysql" table "user"
mysql> select host, user, password from mysql.user;
+-----------+------+----------+
| host      | user | password |
+-----------+------+----------+
| localhost | root |          |
| 127.0.0.1 | root |          |
| ::1       | root |          |
| localhost |      |          |
+-----------+------+----------+
4 rows in set (0.09 sec)

-- Set password for root@127.0.0.1. Replace xxxx with your chosen password
-- Take note that strings are enclosed by a pair of single-quotes!
mysql> set password for 'root'@'127.0.0.1'=password('xxxx');
Query OK, 0 rows affected (0.00 sec)

-- Set password for root@localhost
mysql> set password for 'root'@'localhost'=password('xxxx');
Query OK, 0 rows affected (0.00 sec)

-- Set password for root@::1
mysql> set password for 'root'@'::1'=password('xxxx');
Query OK, 0 rows affected (0.00 sec)

-- Query the users and passwords again
mysql> select host, user, password from mysql.user;
+-----------+------+-------------------------------------------+
| host      | user | password                                  |
+-----------+------+-------------------------------------------+
| localhost | root | *XXXXXXXXXXXXXXXXXXXXXXXXXXXXXXXXXXXXXXXX |
| 127.0.0.1 | root | *XXXXXXXXXXXXXXXXXXXXXXXXXXXXXXXXXXXXXXXX |
| ::1       | root | *XXXXXXXXXXXXXXXXXXXXXXXXXXXXXXXXXXXXXXXX |
| localhost |      |                                           |
+-----------+------+-------------------------------------------+
4 rows in set (0.00 sec)

-- logout and terminate the client program
mysql> quit
Bye
Explanation:
- The command "
select host, user, password from mysql.user" lists all the existing users (kept in System database "mysql" table "user"). Observe that four user accounts are installed by default:'root'@'localhost','root'@'127.0.0.1','root'@'::1'and''@'localhost'(empty string denotes an anonymous user), all WITHOUT password (empty string as password). Take note that a MySQL user is identified by three attributes: username, password, as well the the IP address (or hostname) of the client's machine. For example, the userrootcan only login from the localhost, or IPv4127.0.0.1, or IPv6::1; but not remotely from other IP addresses or hostnames. - Take note that you have to end each command with a semi-colon
';'. Otherwise, a "->" prompt will continue to appear. Enter';'to complete the command. You can also use'\c'to abort the current command. For example,mysql> select host, user, password from mysql.user; ...... ...... mysql> select host, user, password from mysql.user -> ; ...... ...... mysql> select host, u \c mysql>
-- A statement terminated by a semi-colon. -- Send the command to the server for processing. -- This statement is not terminated, continue to the next line. -- End the statement, and send it to the server for processing. -- Cancel the statement. Do not send it to the server. - You can set the password for
'root'@'localhost','root'@'127.0.0.1'and'root'@'::1'using theSET PASSWORDcommand as shown, where 'xxxx' denotes your chosen password. - The hostname localhost, meant for local loop-back testing, has IPv4 address of
127.0.0.1, IPv6 address of::1. - Issue "
quit", "exit", or press control-c to terminate the client. - During a client session, you can issue "
help" or "\h" for help.
We have just set a password for
root and exit the client. Start a client and login as root again. BUT now, you need to include a "-p" option, which prompts user for the password:-- Change the current working directory to <MYSQL_HOME>\bin D:\myproject\mysql\bin> mysql -u root -p Enter password: ******** Welcome to the MySQL monitor. ...... -- client started, ready to issue SQL command mysql>
Remove the Anonymous User
For security reason, remove the anonymous user (identified by an empty-string username) as follows:
mysql> drop user ''@'localhost';

mysql> select host, user, password from mysql.user;
+-----------+------+-------------------------------------------+
| host      | user | password                                  |
+-----------+------+-------------------------------------------+
| localhost | root | *XXXXXXXXXXXXXXXXXXXXXXXXXXXXXXXXXXXXXXXX |
| 127.0.0.1 | root | *XXXXXXXXXXXXXXXXXXXXXXXXXXXXXXXXXXXXXXXX |
| ::1       | root | *XXXXXXXXXXXXXXXXXXXXXXXXXXXXXXXXXXXXXXXX |
+-----------+------+-------------------------------------------+
3 rows in set (0.00 sec)

mysql> quit
STEP 6: Create a New User
The superuser "root" is privileged and is not meant for normal use. For general usage, we need to create a normal user (let's call it "
myuser") with a lesser privilege. To create a new user, start a client with superuser "root":D:\myproject\mysql\bin> mysql -u root -p Enter password: ******** -- Create a new user called myuser, which can login from localhost, with password xxxx mysql> create user 'myuser'@'localhost' identified by 'xxxx'; Query OK (0.01 sec) --> Grant permission to myuser mysql> grant all on *.* to 'myuser'@'localhost'; Query OK (0.01 sec) --> Query all users and passwords mysql> select host, user, password from mysql.user; +-----------+--------+-------------------------------------------+ | host | user | password | +-----------+--------+-------------------------------------------+ | localhost | root | *XXXXXXXXXXXXXXXXXXXXXXXXXXXXXXXXXXXXXXXX | | 127.0.0.1 | root | *XXXXXXXXXXXXXXXXXXXXXXXXXXXXXXXXXXXXXXXX | | ::1 | root | *XXXXXXXXXXXXXXXXXXXXXXXXXXXXXXXXXXXXXXXX | | localhost | myuser | *XXXXXXXXXXXXXXXXXXXXXXXXXXXXXXXXXXXXXXXX | +-----------+--------+-------------------------------------------+ 4 rows in set (0.00 sec) mysql> quit
Explanation:
- The command "
create user" creates a new user called "myuser@localhost", who can access the server locally on the same machine (but not remotely from another machine), with password "xxxx" (to be chosen by you). - The newly created user has none of the privileges.
- The "
grant" command grants "all" the privileges (except the so-called "grant" option to grant privileges to other users) to this new user for all the databases and all the tables ("ON *.*"). For production, you should grant only the necessary privileges (e.g., "select,insert,update" instead of "all") on selected databases and selected tables (e.g.,studentdb.*- all tables of the databasestudentdb).
STEP 7: Create a new Database, a new Table in the Database, Insert Records, Query and Update
A MySQL server contains many Databases (aka Schema). A database consists of many Tables. A table contains Rows (aka Records) and Column (aka Fields).
Let's create a database called "
studentdb" and a table called "class101" in the database. The table shall contain three columns: id (of type INT), name (of type VARCHAR(50)), gpa (of typeFLOAT).CAUTION: Programmers don't use blank and special characters in names (such as database names, table names, column names). It is either not supported, or will pose you many more challenges.
TIPS: Before we proceed, here are some tips on using the client:
- You need to terminate your command with a semi-colon "
;", which sends the command to the server for processing. - A command can span several lines, and terminated by a semi-colon "
;". - You can use
\cto abort the current command. - You can use up/down arrow keys to retrieve the previous commands issued (history commands).
- You should enable copy/paste functions of CMD shell. [To enable copy/paste, click CMD's icon ⇒ Properties ⇒ Options ⇒ Edit Options ⇒ Check "QuickEdit Mode". You can then select the desired texts and use a "right-click" to copy the selected text; another "right-click" to paste.]
Let's start a client with our newly-created user "
myuser".D:\myproject\mysql\bin> mysql -u myuser -p Enter password: ******** -- Create a new database called studentdb mysql> create database if not exists studentdb; Query OK, 1 row affected (0.08 sec) -- list all the databases in this server mysql> show databases; +--------------------+ | Database | +--------------------+ | information_schema | | mysql | | performance_schema | | studentdb | | test | +--------------------+ 5 rows in set (0.07 sec) -- Use database studentdb as the current default database mysql> use studentdb; Database changed -- Remove the table class101 in current database if exists mysql> drop table if exists class101; Query OK, 0 rows affected (0.15 sec) -- Create a new table class101 in current database with 3 columns mysql> create table class101 (id int, name varchar(50), gpa float); Query OK, 0 rows affected (0.15 sec) -- List all the tables in the default database (studentdb) mysql> show tables; +---------------------+ | Tables_in_studentdb | +---------------------+ | class101 | +---------------------+ 1 row in set (0.00 sec) -- Describe table class101 by listing its columns definition mysql> describe class101; +-------+-------------+------+-----+---------+-------+ | Field | Type | Null | Key | Default | Extra | +-------+-------------+------+-----+---------+-------+ | id | int(11) | YES | | NULL | | | name | varchar(50) | YES | | NULL | | | gpa | float | YES | | NULL | | +-------+-------------+------+-----+---------+-------+ 3 rows in set (0.04 sec) -- Insert a row into table class101. Strings are to be quoted. No quotes for numbers. mysql> insert into class101 values (11, 'Tan Ah Teck', 4.8); Query OK, 1 row affected (0.03 sec) -- Insert another row mysql> insert into class101 values (22, 'Mohamed Ali', 4.9); Query OK, 1 row affected (0.03 sec) -- List all the rows and columns in table class101 mysql> select * from class101; +----+-------------+------+ | id | name | gpa | +----+-------------+------+ | 11 | Tan Ah Teck | 4.8 | | 22 | Mohamed Ali | 4.9 | +----+-------------+------+ 2 rows in set (0.00 sec) -- update selected records mysql> update class101 set gpa = 4.4 where name = 'Tan Ah Teck'; Query OK, 1 row affected (0.03 sec) mysql> select * from class101; +----+-------------+------+ | id | name | gpa | +----+-------------+------+ | 11 | Tan Ah Teck | 4.4 | | 22 | Mohamed Ali | 4.9 | +----+-------------+------+ 2 rows in set (0.00 sec) -- delete selected records mysql> delete from class101 where id = 22; Query OK, 1 row affected (0.03 sec) mysql> select * from class101; +----+-------------+------+ | id | name | gpa | +----+-------------+------+ | 11 | Tan Ah Teck | 4.4 | +----+-------------+------+ 1 rows in set (0.00 sec) -- You can store SQL statements in a text file (called SQL script) and run the -- script, instead of entering each of the SQL statements from the prompt. -- For example, use a text editor to create a SQL script called "mycommands.sql" -- containing the following three SQL statements. Save the file under "d:\myproject". insert into class101 values (33, 'Kumar', 4.8); insert into class101 values (44, 'Kevin', 4.6); Select * from class101; -- Use the following "source" command to run the file. -- You need to provide the full path to the script. -- Use Unix's forward slash '/' as directory separator, -- instead of Windows' back slash '\'. mysql> source d:/myproject/mycommands.sql Query OK, 1 row affected (0.00 sec) // INSERT command output Query OK, 1 row affected (0.00 sec) // INSERT command output +------+-------------+------+ // SELECT command output | id | name | gpa | +------+-------------+------+ | 11 | Tan Ah Teck | 4.4 | | 33 | Kumar | 4.8 | | 44 | Kevin | 4.6 | +------+-------------+------+ 3 rows in set (0.00 sec)
Try:
- Select records with names starting with letter
'K'. (Hints:name like 'K%') - Select records with names NOT starting with letter
'K'. (Hints:name NOT like ...) - Select records with
gpabetween 4.3 and 4.5. (Hints:gpa >= 4.3 AND ...) - Select records with names having a letter
'e'. (Hints:name like '%e%') - Select records with names having a letter
'e'or'a'. (Hints:... OR ...) - Select records with names NOT having a letter
'e'or'a'. (Hints:NOT (... OR ...)) - Select records with names having a letter
'e'andgpa ≥ 4.5.
(Skip Unless... ) Read "Common Problems in Using the mysql Client".
(For Advanced Users only - Remote Login): If a user is permitted to login remotely from another machine, you can use command "
mysql -h serverHostname -u username -p" to login remotely by specifying server's hostname or (IP address) via the '-h' option.Summary of Frequently-Used MySQL Commands:
MySQL commands are NOT case sensitive.
// General
STATUS      // Display Server's information such as port number
;           // Send command to server (or \g)
\c          // Abort the current command, clear current input
\G          // Display the row vertically

// Database-level
DROP DATABASE databaseName                 // Delete the database
DROP DATABASE IF EXISTS databaseName       // Delete if it exists
CREATE DATABASE databaseName               // Create a new database
CREATE DATABASE IF NOT EXISTS databaseName // Create only if it does not exists
SHOW DATABASES                             // Show all databases in this server

// Set default database.
// Otherwise you need to use the fully-qualified name, in the form
//   of "databaseName.tableName", to refer to a table.
USE databaseName

// Table-level
DROP TABLE tableName
DROP TABLE IF EXISTS tableName
CREATE TABLE tableName (column1Definition, column2Definition, ...)
CREATE TABLE IF NOT EXISTS tableName (column1Definition, column2Definition, ...)
SHOW TABLES              // Show all the tables in the default database
DESCRIBE tableName       // Describe the columns for the table
DESC tableName           // Same as above

// Record-level
INSERT INTO tableName VALUES (column1Value, column2Value,...)
INSERT INTO tableName (column1Name, ..., columnNName)
   VALUES (column1Value, ..., columnNValue)
DELETE FROM tableName WHERE criteria
UPDATE tableName SET columnName = expression WHERE criteria
SELECT column1Name, column2Name, ... FROM tableName
   WHERE criteria
   ORDER BY columnAName ASC|DESC, columnBName ASC|DESC, ...

// Running a script of MySQL statements
SOURCE fullPathFilename
EXERCISE (Relating Tables)
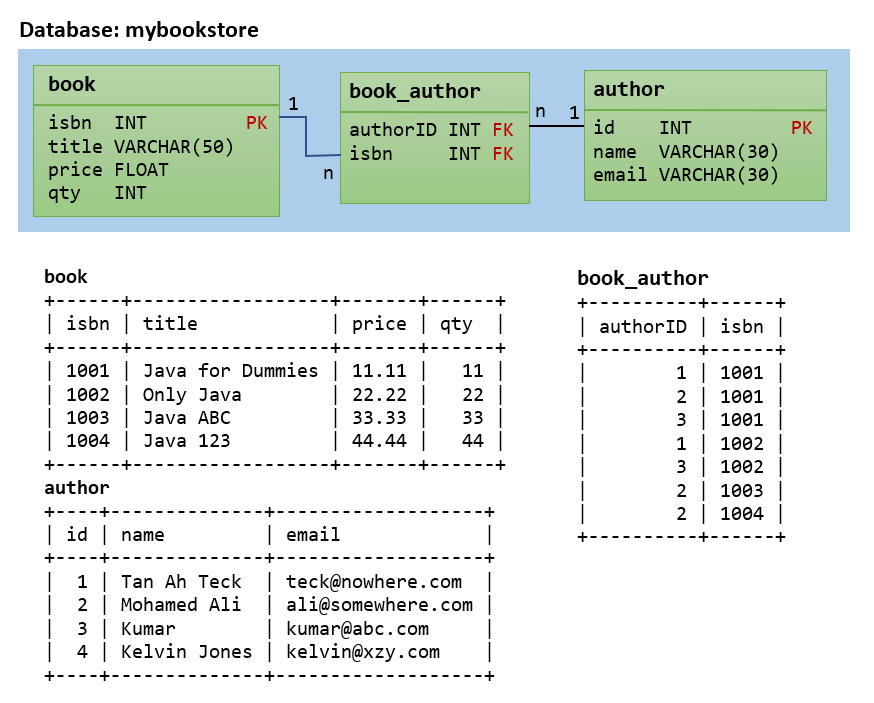
A book is written by one or more authors. An author may write zero or more books. This is known as a many-to-many relationship, which can be modeled with 3 tables, as shown:
- Create a database called "
mybookstore". - Create 3 tables "
books", "authors", and "books_authors" in the database "mybookstore". - Insert the respective records into the tables. Check the contents of each of the tables (via
SELECT * from tableNamecommand). - Try this query and explain the output:
SELECT books.title, books.price, authors.name FROM books, books_authors, authors WHERE books.isbn = books_authors.isbn AND authors.authorID = books_authors.authorID AND authors.name = 'Tan Ah Teck'; - Issue a query to display all the books (
title,price,qty) by "Tan Ah Teck" withpriceless than20. - Issue a query to display all the authors (
nameandemail) for the book title "Java for Dummies". - Issue a query to display the books (
title,price,qty) and all the authors (nameandemail) for books with title beginning with "Java" (Hints:title LIKE 'Java%').
STEP 8: (For Java Programmers) Write a Java Database Program
Instead of using the "
mysql" client program provided (in Step 7), you can also write your own client program (in Java or other programming languages) to access the database server. Your client program shall create a TCP socket to connect to the database server at port 8888, issue the SQL statements, and process the results received.Before you proceed, I shall assume that you are familiar with Java Programming and have installed the followings:
- JDK (Read "How to install JDK and Get Started").
- A programming text editor, such as TextPad or Notepad++ (Read "Programming Text Editor"); or a Java IDE such as Eclipse or NetBeans (Read "How to Install Eclipse" or "How to Install NetBeans").
STEP 8(a): Install the MySQL Database JDBC Driver
You need to install an appropriate JDBC (Java Database Connectivity) driver to run your Java database programs. The MySQL's JDBC driver is called "MySQL Connector/J".
- Download MySQL JDBC driver from www.mysql.com. Select top-level tab "Downloads" ⇒ "Connectors" ⇒ "Connector/J" ⇒ 5.1.xx ⇒ ZIP version ("mysql-connector-java-5.1.xx.zip", 3.9MB).
- UNZIP the download file (into "
d:\myproject"). - Copy "
mysql-connector-java-5.1.xx-bin.jar" to your JDK's extension directory at "<JAVA_HOME>\jre\lib\ext" (e.g., "c:\program files\java\jdk1.7.xx\jre\lib\ext").
(For Advanced User Only) You can compile Java database programs without the JDBC driver. But to run the JDBC programs, the driver's JAR-file must be included in theCLASSPATH, or the JDK's extension directory. You could set theCLASSPATHvia "Control Panel" ⇒ System ⇒ (Vista/7 only) Advanced system settings ⇒ Switch to "Advanced" tab ⇒ "Environment variables" ⇒ Choose "System Variables" (for all users in this system) or "User Variables" (for this login user only) ⇒ Choose "New" or "Edit"⇒ In "Variable Name", enter "classpath" ⇒ In "Variable Value", enter ".;path-to\mysql-connector-java-5.1.xx-bin.jar", where "path-to" refers to the full path to the driver's JAR-file. You could also include theCLASSPATHin the command-line "java -cp .;path-to\mysql-connector-java-5.1.xx-bin.jar JdbcProgramClassname" to run your program.
STEP 8(b): Write a Java Database Program
After installing the MySQL driver, you can now write your Java programs, as a client, to access the MySQL server. The program uses a so-called database-URL to connect to the server. Thedatabase-URL for MySQL is in the form of "
jdbc:mysql://localhost:8888/studentdb", where "localhost" (with IP address of 127.0.0.1) is the hostname for local loop-back testing;"8888" is the server's port number; and "studentdb" is the default database (equivalent to the MySQL command "use database"). You need to provide the username and password as well.A Java database program consists of five steps:
- Establish a
Connectionto the database server. - Create a
Statementobject inside theConnection. - Write a SQL query and execute the query, via the
StatementandConnectioncreated. - The query result could be an
intor aResultSetobject. Process the records in theResultSet, if applicable. - Close the
StatementandConnection.
For example, the following program creates a table called "
class202" in the database "studentdb" (which has been created in the earlier exercise; otherwise, you need to create this database before running this program), inserts a few records, and queries the table.1 2 3 4 5 6 7 8 9 10 11 12 13 14 15 16 17 18 19 20 21 22 23 24 25 26 27 28 29 30 31 32 33 34 35 36 37 38 39 40 41 42 43 44 45 46 47 48 49 50 51 52 53 54 55 56 57 58 59 60 61 62 63 64 65 66 67 68 69 70 71 72 73 74 | import java.sql.*; // Using JDBC package public class MySQLTest { // Requires JDK 6 and above public static void main(String[] args) throws SQLException { Connection conn = null; // Declare a Connection object called conn Statement stmt = null; // Declare a Statement object called stmt try { // Step 1: Allocate the database "Connection" conn = DriverManager.getConnection( "jdbc:mysql://localhost:8888/studentdb", "myuser", "xxxx"); // <== check // database-url(hostname, port, default database name), user, password // Use IP address 127.0.0.1 if localhost does not work! // Step 2: Allocate the "Statement" from the "Connection" stmt = conn.createStatement(); // Step 3 & 4: Query and process the query result String sqlStr; // SQL string int returnCode; // return-code of the database server running the SQL statement // Remove table "class202" from the current database "studentdb" // (specified in the database-url) sqlStr = "drop table if exists class202"; System.out.println(sqlStr); // Echos the command for debugging returnCode = stmt.executeUpdate(sqlStr); // Send to database server if (returnCode == 0) { // Check the return code System.out.println("Table 'class202' dropped"); } System.out.println(); // Create table "class202" in the current database "studentdb" sqlStr = "create table class202 (id int, name varchar(50), gpa float)"; System.out.println(sqlStr); returnCode = stmt.executeUpdate(sqlStr); if (returnCode == 0) { System.out.println("Table 'class202' created"); } System.out.println(); // Insert a few records sqlStr = "insert into class202 values (3333, 'Kumar', 4.4)"; System.out.println(sqlStr); returnCode = stmt.executeUpdate(sqlStr); System.out.println(returnCode + " row(s) inserted"); sqlStr = "insert into class202 values (4444, 'Kevin Jones', 4.6)"; System.out.println(sqlStr); returnCode = stmt.executeUpdate(sqlStr); System.out.println(returnCode + " row(s) inserted"); sqlStr = "insert into class202 values (5555, 'Peter Jones', 4.3)"; System.out.println(sqlStr); returnCode = stmt.executeUpdate(sqlStr); System.out.println(returnCode + " row(s) inserted"); System.out.println(); // Query the database sqlStr = "select * from class202"; System.out.println(sqlStr); // Echos the command for debugging ResultSet rset = stmt.executeQuery(sqlStr); // Send to database server // Process the returned "ResultSet", i.e., resultant table. // A cursor initially points before the first record. while (rset.next()) { // Move the cursor to the next record // Retrieve the fields from each record int id = rset.getInt("id"); String name = rset.getString("name"); System.out.printf("%4d %-30s%n", id, name); } } catch (SQLException ex) { ex.printStackTrace(); } finally { // Step 5: Always close the resources if (stmt != null) stmt.close(); if (conn != null) conn.close(); } } } |
Try:
- Select and display all the 3 columns. (Hints: retrieve the column via
getFloat("gpa"), and modify your print statement to print thegpa.) - Select records with names starting with letter
'K'. (Hints:name like 'K%') - Select records with names having a letter
'J'. (Hints:name like '%J%') - Select records with
gpa ≥ 4.5. (Hints:gpa >= 4.5) - Select records with names having a letter
'J'andgpa ≥ 4.5. (Hints:name like '%J%' AND gpa >= 4.5)
Read "Java Database Programming (JDBC) Basics" for more about Java Database programming.
(Skip Unless...) Read "Common Errors in JDBC Programming on MySQL".
(For Users with JDK prior to JDK 6) You need to explicitly load the MySQL driver in your program, before allocating a
Connection.try {
// Load Database driver
Class.forName("com.mysql.jdbc.Driver"); // for MySQL
// Class.forName("sun.jdbc.odbc.JdbcOdbcDriver"); // for MS Access
} catch (ClassNotFoundException ex) {
ex.printStackTrace();
}(For Advanced Users Only - JDK 7) JDK 7 introduces a new
try-with-resources syntax, which automatically closes the opened resources. The above example can be re-written as follow:import java.sql.*; // Use JDBC package public class MySQLJdbcTestJDK7 { // Need JDK 7 to compile and run public static void main(String[] args) { try ( // Step 1: Create a database "Connection" Connection conn = DriverManager.getConnection( "jdbc:mysql://localhost:8888/studentdb", "myuser", "xxxx"); // Database-url(host, port, default database name), user, password // Step 2: Create a "Statement" from the "Connection" Statement stmt = conn.createStatement() ) { // Step 3 & 4: Query and Process the query result String sqlStr; // SQL statement string int returnCode; // return code of the database server running the SQL statement // Remove table "class202" from the current database "studentdb" // (specified in the database-url) sqlStr = "drop table if exists class202"; System.out.println(sqlStr); // Echos the command for debugging returnCode = stmt.executeUpdate(sqlStr); // Send to database server if (returnCode == 0) { // Check the return code System.out.println("Table 'class202' dropped"); } System.out.println(); // Create table "class202" in the current database "studentdb" sqlStr = "create table class202 (id int, name varchar(50), gpa float)"; System.out.println(sqlStr); returnCode = stmt.executeUpdate(sqlStr); if (returnCode == 0) { System.out.println("Table 'class202' created"); } System.out.println(); // Insert a few records sqlStr = "insert into class202 values (3333, 'Kumar', 4.4)"; System.out.println(sqlStr); returnCode = stmt.executeUpdate(sqlStr); System.out.println(returnCode + " row inserted"); sqlStr = "insert into class202 values (4444, 'Kevin Jones', 4.6)"; System.out.println(sqlStr); returnCode = stmt.executeUpdate(sqlStr); System.out.println(returnCode + " row inserted"); sqlStr = "insert into class202 values (5555, 'Peter Jones', 4.3)"; System.out.println(sqlStr); returnCode = stmt.executeUpdate(sqlStr); System.out.println(returnCode + " row inserted"); System.out.println(); // Query the database sqlStr = "select * from class202"; System.out.println(sqlStr); // Echos the command for debugging ResultSet rset = stmt.executeQuery(sqlStr); // Send to database server // Process the returned "ResultSet", i.e., resultant table. // A cursor initially points before the first record. while (rset.next()) { // Move the cursor to the next record // Retrieve the fields from each record int id = rset.getInt("id"); String name = rset.getString("name"); System.out.printf("%4d %-30s%n", id, name); } } catch (SQLException ex) { ex.printStackTrace(); } // Step 5: Close the resources - done by try-with-resources automatically } }
(For Advanced Users Only - UTF-8 Support) To request for UTF-8 support, use the following database-URL:
jdbc:mysql://hostname:port/studentdb?useUnicode=yes&characterEncoding=UTF-8
Your Eclipse/NetBeans should also be configured to use UTF-8 encoding.
Backup and Restore Databases
Backup via "mysqldump" Utility Program
You can use the
"mysqldump" utility program to back up the entire server (all databases), selected databases, or selected tables of a database. It generates a SQL script containing all the SQL statements that can later be executed to re-create the databases, tables and their contents.-- Dump selected databases with --databases option prompt> mysqldump -u username -p --databases database1Name [database2Name ...] > backupFile.sql -- Dump all databases in the server with --all-databases option, except mysql.user table (for security) prompt> mysqldump -u root -p --all-databases --ignore-table=mysql.user > backupServer.sql -- Dump all the tables of a particular database prompt> mysqldump -u username -p databaseName > backupFile.sql -- Dump selected tables of a particular database prompt> mysqldump -u username -p databaseName table1Name [table2Name ...] > backupFile.sql
For example, the following command backup the entire
studentdb database to a SQL script d:\myproject\backup_studentdb.sql.-- Change the current working directory to <MYSQL_HOME>\bin
D:\myproject\mysql\bin> mysqldump -u myuser -p --databases studentdb > "d:\myproject\backup_studentdb.sql"
Study the output file, which contains
CREATE DATABASE, CREATE TABLE and INSERT statements to recreate the database and tables dumped.Restore via "source" command in a mysql client:
You can restore from the backup by running the "
source" command in an interactive client. For example, to restore the studentdb backup earlier:-- Start and login to client D:\myproject\mysql\bin> mysql -u username -p ...... -- Run the backup script to recreate the database mysql> drop database if exists studentdb; mysql> source d:/myproject/backup_studentdb.sql
(For Advanced Users) NetBeans and MySQL
NetBeans provides direct support to MySQL server. You can use NetBeans as a GUI client to access a MySQL server, as well as an administrative tool (e.g., starting and stopping the server). Read NetBeans' article "Connecting to a MySQL Database" @ http://netbeans.org/kb/docs/ide/mysql.html.
Configuring NetBeans to Support MySQL
From NetBeans "Window" menu ⇒ Select "Services". The "Services" tab shall appear on the left panel.
- Right-click on the "Databases" node ⇒ "Register MySQL Server". (If you have already registered a MySQL server, you can right-click on Server node "
MySQL Server at hostname:port" ⇒ Properties, to modify its properties.) - Select the "Basic Properties" tab, enter the hostname, port number, root user and password.
- Select the "Admin Properties" tab:
- Leave the "Path/URL to admin tool" empty.
- In "Path to start command", enter "
<MYSQL_HOME>\bin\mysqld.exe"; in the "Arguments", enter "--console" - In "Path to stop command", enter "
<MYSQL_HOME>\bin\mysqladmin.exe", in the "Arguments", enter "-u root ppassword shutdown".
- A server node "
MySQL Server at hostname:port" appears.
Database Administration - Start/Stop the Server and Create Databases
- You can start the MySQL server by right-clicking on the server node ⇒ select "start". [There seems to be a problem here. If a "connection refused: connect" error occurs, enter the password again.]
- Once the MySQL server is started and connected, you can see the list of databases by expanding the MySQL server node. You can create a new database by right-clicking on it and choose "Create Database...".
Create a new Connection
You need a connection to manipulate data. You can create multiple connections with different users and default databases.
- Right-click on the "Databases" ⇒ "New Connection..." ⇒ Select the driver "MySQL Connector/J" ⇒ Next ⇒ Enter hostname, port number, default database, a general username and password ⇒ "Test Connection" (make sure that MySQL is started) ⇒ Finish.
- A connection node "
jdbc:mysql://hostname:port/defaultDatabase" appears.
Manipulating Data via a Connection
- Right-click on a connection node (e.g., "
jdbc:mysql://hostname:port/defaultDatabase") ⇒ Choose "Connect" (if not connected, provided that the MySQL server has been started). - You can expand the connection node to view all the databases.
- Expand an existing database. There are three sub-nodes "Tables", "View" and "Procedures". Right-click on the "Tables" to create table or execute command. Similarly, right-click on the "View" and "Procedures".
- To view/manipulate the records in a table, right-click on the selected table ⇒ You can choose to "View Data...", "Execute Command...", etc.
- You can right-click on the connection to "connect" or "disconnect" from the server.
Create a SQL Script and Run the Script
You can create a SQL script by right-clicking on a project ⇒ New ⇒ "SQL File". You can run the script by right-clicking on the SQL script ⇒ "Run File" ⇒ Select an existing connection (or create a new connection) to run the script. You could also run a single statement (right-click on the statement ⇒ Run Statement) or a selected group of statements (highlight the statements ⇒ Right-click ⇒ Run Selection).
(For Advanced Users) MySQL GUI Tool - MySQL Workbench
"MySQL Workbench (GUI tool)" provides a graphical user interface for interacting with the MySQL server. To install:
- From http://www.mysql.com/downloads/, select "MySQL Workbench (GUI Tool), Generally Available Release: 5.2.xx". Download the ZIP version WITHOUT installer (e.g., "mysql-workbench-gpl-5.2.xx-win32-noinstall.zip").
- UNZIP the downloaded files (into "
d:\myproject").
MySQL Workbench supports three main functions:
- MySQL Development: Connect to existing databases and run SQL queries, scripts, edit data and manage database objects.
- MySQL Server Administration: Configure your database server, setup user accounts, browse status variables and server logs.
- Data Modeling: Create and manage database models, forward and reverse engineering, compare and synchronize database schemas, and report.
To launch the MySQL Workbench, run "
MySQLWorkbench.exe", which can be found under the installed directory.SQL Development
- Select "Open connection to start querying", enter "127.0.0.1" or "localhost" as hostname; "8888" as port number; "myuser" as username; the password; and "studentdb" as the default schema (default database).
- Enter a SQL statement, and push the "execute" button.
Server Administration
- "New Server Instance" ⇒ "Localhost" ⇒ Next ⇒ Enter "localhost" as hostname; "8888" as port number; "root" as username; the password; and leave the default schema (default database) empty. You may need to specify the MySQL installed directory and the
my.iniconfiguration file.
Data Modeling
To create the database diagram for an existing database (reverse engineering), select "Create EER model from existing database", ...Read the MySQL Workbench documentation, available at http://dev.mysql.com/doc/workbench/en/index.html.
MySQL Workbench graphical tool, in my opinion, is not mature and is quite hard to use. There are others famous web-based MySQL graphical tools, such as "SQL Buddy" and "phpMyAdmin". Unfortunately, they are written in PHP and need to be run under a web server (such as Apache). They are often used in a so-called WAMP (Windows-Apache-MySQL-PHP) or LAMP (Lunix-Apache-MySQL-PHP) environment.
NetBeans also provides a GUI interface to MySQL Server (described above).
(For Advanced Users) Running MySQL as a Windows Service
In a production environment, it is more convenient to run MySQL as a Windows "service". A Windows service is a background process, which does not interact with the users. It is called daemonin Unix. This is because a service can start automatically whenever the system is started, and re-start automatically after an unexpected interruption.
To install MySQL as a service, start a
CMD shell (with administrator right) and run:<MYSQL_HOME>\bin> mysqld --install Service successfully installed.
A MySQL service named "
mysql" would be installed and will start automatically whenever the system is started. Check "Control Panel" ⇒ "Administrative Tools" ⇒ "Services" ⇒ Service "mysql".You can start the MySQL service via the "Control Panel" ⇒ "Administrator Tools" ⇒ "Services" ⇒ Service "mysql" ⇒ "Start"; or issue the following command from a CMD shell:
<MYSQL_HOME>\bin> net start mysql
The MySQL service is starting.
The MySQL service was started successfully.
You can stop MySQL service via the "Control Panel"; or issue the following command:
<MYSQL_HOME>\bin> net stop mysql
The MySQL service is stopping.
The MySQL service was stopped successfully.
To uninstall MySQL service, use:
<MYSQL_HOME>\bin> mysqld --remove
Service successfully removed.
myTectra Offers the best Ansys Training in Bangalore and get started to become hands on experts on Ansys trained by Experienced Professional.keep it up!!
ReplyDeleteandroid training in chennai
android online training in chennai
android training in bangalore
android training in hyderabad
android Training in coimbatore
android training
android online training